~Entering Application Data into eFORCE
Introduction
While the counselor or teacher may enter application data into eFORCE, support staff are responsible for ensuring the application data and case note are entered into eFORCE and for printing documents for the paper case file.
Entering data for a new application requires:
1. Adding a New Case in eFORCE.
How to enter secondary contact information.
How to enter additional addresses.
2. Completing and Printing the Case Application Page.
3. Updating the Client Data Page.
4. Printing the Application Case Note and Client Summary Page.
Adding a New Case in eFORCE
Before you can enter the application data into eFORCE, you must create a new case. Complete these steps to create a new case in eFORCE.
Step 1
Open the applicant’s record in eFORCE.
Step 2
Choose the New Case button on the Client Summary page.
The first Add New Case page opens.
Note: Every case requires a referral history. Usually, the referral information has been entered prior to application. Occasionally, you may receive an application before the referral information has been completed. If you receive a prompt indicating a Referral History is required, contact the VR counselor submitting the application and / or the VR Counselor Supervisor. (This scenario may occur when a previous client contacts his / her counselor directly about opening a new case.)

Step 3
Using information from paper application:
- Choose the VR option in the Case Type combo box.
- Choose the No option in the Limited Case combo box.
- Choose the correct username in the Case Manager combo box.
Step 4
Choose the Submit button.
The Case Summary page opens. A note indicates that the case status will not change until application data has been entered.
Next Steps
Once you have created a new case, proceed to Completing the Case Application Page in eFORCE.
Completing the Case Application Page in eFORCE
Once you have created a new case, you can enter the application data. Use information from the dictation or paper application to complete the Case Application page. The following details the steps to enter application data and print the Case Application page for filing.
Step 1
Choose the Application link in the Navigation bar.
The Case Application page for the client opens.
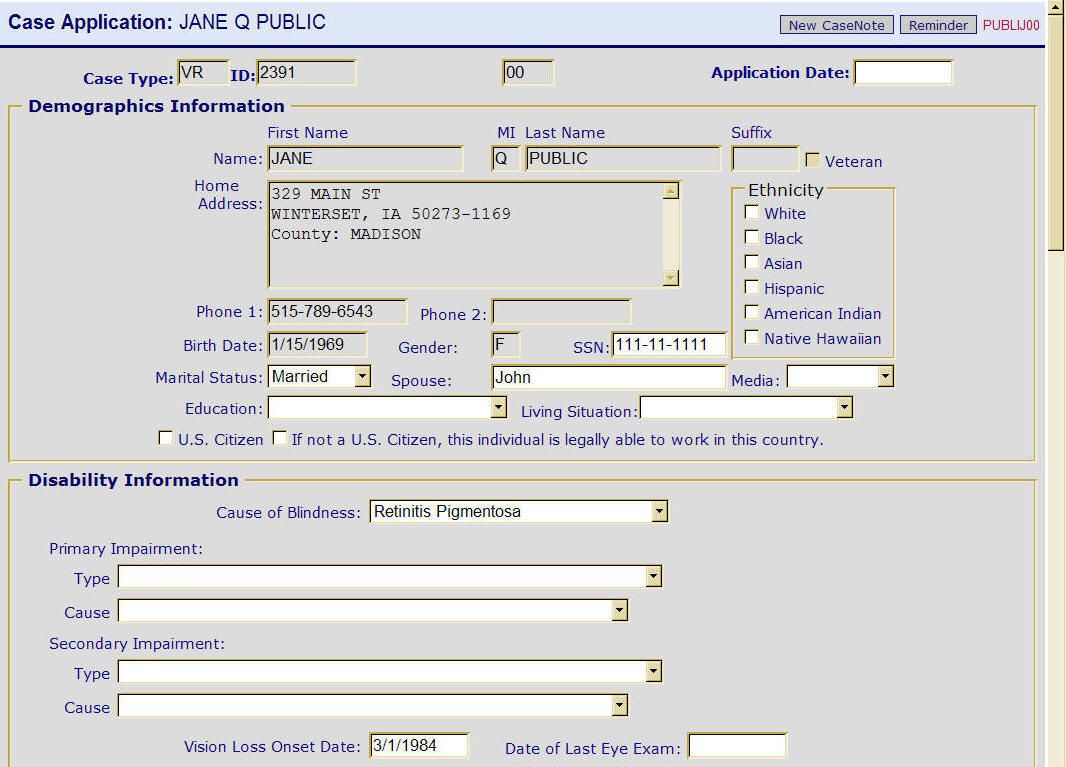
Step 2
Enter the date the application was signed in the Application Date field. (Application Signed On Date is on the last page of the application form.)

Step 3
Review and enter data into the Demographics fields.
Compare the information previously entered with information on the application. If the incorrect information appears in a grayed out / inactive field, you may correct it by returning to the Client Summary page. (Choose the Client Summary link in the Navigation Bar to return to the Client Summary page.) From the Client Summary page you may choose the Demographic Details, Home Address, or Disability Details links to update the data as necessary.
If the incorrect information appears in a white / active field, you may correct it on this page.

Step 4
Review and enter data into the Disability Information fields.
Guidelines for this section:
You must enter Primary and Secondary Impairment information.
In the Cause of Blindness field, enter the cause given by the applicant.
Primary Impairment
In the Primary Impairment Type field, enter the type of impairment. In most instances, this will be Blindness or Other Visual Impairments.
In the Primary Impairment Cause field, enter the 911 code that corresponds to the cause you entered as the Cause of Blindness.For example: An applicant indicates the cause of his blindness is Fuch’s Dystrophy. Complete the Cause of Blindness, Primary Impairment Type, and Primary Impairment Cause fields as follows:
Cause of Blindness: Fuch’s Dystrophy
Primary Impairment Type: Blindness
Primary Impairment Cause: Congenital Condition or Birth InjuryFor a list of types, choose the Impairment Types link.
For a list of blindness causes and corresponding 911 impairment cause codes, choose the Cause of Blindness and Cause Codes link.Secondary Impairment
If no secondary impairment information is provided, choose the “No Impairment” option in the Secondary Impairment Type combo box and the “Cause Unknown or None” option in the Secondary Impairment Cause combo box.If a secondary impairment is indicated, complete the Secondary Impairment Type and Secondary Impairment Cause fields using the same guidelines as primary impairment.

Step 5
Review and enter data for the Sources of Support fields.
Guidelines for this section:
You must enter information into these fields:
- SSI Blind Amount
- SSI Disabled Amount
- SSDI Amount
If no amounts are given, enter 0 in each of these fields.
For an explanation of the Sources of Support fields, go to the Definitions listed in the Completing an Application section of this chapter.

Step 6
Review and complete the Medical Insurance Coverage and Employment (at Application) fields.
Guidelines for this section:
Enter weekly earnings as a whole number without a dollar sign.

Step 7
Review and complete the Health Assessment fields.
Guidelines for this section:
The Health Assessment fields should contain a brief summary of the information from the Health Assessment Questionnaire.

Step 8
Check the appropriate Application Checklist check boxes.
Guidelines for this section:
If the “Completed” option is selected in the Voter Registration field, verify the Voter Registration form has been completed and mailed.

Step 9
Enter the case note information into the Application Case Note edit field.
Guidelines for this section:
For guidelines on type of information the case note should contain, choose the application case note link.

Step 10
Choose the Spell Check button.
The text from the application fields will be copied into Microsoft Word.
If spelling errors are found the Spelling dialog box will prompt you to choose a correction or ignore the word.
If no errors are found, a dialog box will indicate that “Spellchecking has been completed.” Choose the OK button to return to the application page.
Step 11
Check the Application Signed On check box.
Step 12
Enter the date on which the application was signed in the text field.
Step 13
Choose the Submit button.
If you have not entered information into required fields, a dialog box will indicate which fields need data. (A red asterisk will appear next to the field.) Complete the fields as required. Then, choose the Submit button again.
If you have entered information correctly, a note will appear at the top of the page indicating that the application has been saved.

Step 14
Print the Case Application page by choosing the Print command on the File menu or by choosing the Print button on the toolbar.
Step 15
File the printed application under the Certification / Medical Data tab in the client’s paper case file.
Next Steps
Once you have entered the application data and printed the application page, the next step in the process is to complete the Client Data page.
Updating the Client Data Page
Once you have entered the application data, update the Client Data page using data from the Health Assessment questionnaire. The following details the steps for updating the Client Data page and printing the page for filing.
Step 1
Choose the Client Summary link in the Navigation bar.
The Client Summary page opens.
Step 2
Choose the Client Data link in the Navigation bar.
The Client Data page opens.

Step 3
Under the Disability Information heading, choose the appropriate option in the Blind Code field (Blind, Not Blind, Presumed Blind, Unknown, or Visually Impaired).
If you choose the “Blind” option, enter today’s date in the Blind Journal Date field. (If the Blind option is already selected and no date appears in the Blind Journal Date field, enter today’s date.)
Step 4
Choose the Health Assessment link to show the Health Assessment fields.
Step 5
Enter the Health Assessment Date and Date of Last Eye Exam. Complete other fields as necessary.
Important Note: The Additional Information field is for additional disability information. (Such as, “uses hearing aids.“) Do NOT enter additional contact information into this field!

Step 6
Choose the Submit button.
If you have entered information correctly, a note will appear at the top of the page indicating that the disability changes have been saved.
Next Steps
Once you have entered the updated the Client Data page, the next step in the process is to print the Application Case Note and the Client Summary page for filing into the paper case file.
Printing the Application Case Note and Client Summary Page
The last step in recording the application is to update and print the Application Case note and to print the Client Summary page. These printed documents will be placed into the client’s case file.
Step 1
Choose the Case Notes link in the Navigation bar.
The Case Notes page will open.

Step 2
Choose the numbered link for the application case note.
The Client Case Note page will open.

Step 3
Change the Subject field to: Application - Status 02.

Step 4
Verify the Client Contacted check box is checked and the “V” code appears in the IL Code combo box.
Step 5
Choose the Submit button at the bottom of the Client Case Note page.
The Case Notes list page will open.
Step 6
Choose the Print link for the application case note.

A Case Note page will open in a separate window.
Step 7
Print the Case Note by choosing the Print command on the File menu or by choosing the Print button on the toolbar.
Step 8
Close the Case Note window by choosing the Close command on the File menu.
Step 9
Choose the Client Summary link in the Navigation bar.
The Client Summary Page opens.
Step 10
Print Client Summary page by choosing the Print command on the File menu or by choosing the Print button on the toolbar.
Step 11
File the printed application case note under the Case Recording tab in the client’s case file.
Step 12
File the printed Client Data document at the front of the client’s case file.
Return to Completing an Application.
OR
Go to Gathering additional information for eligibility and vocational planning.